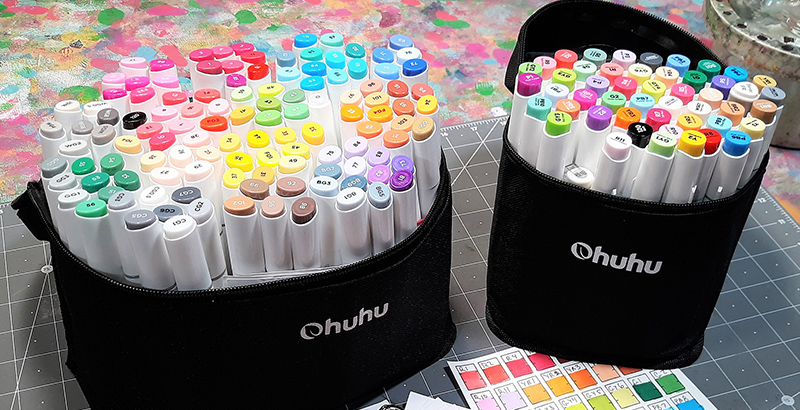
Alcohol markers are a wonderful medium that can give your projects a vibrant and professional look. These pens offer a smooth, streak-free finish and they blend like a dream as long as you know-how. Today I’m going to share my 6 favorite ways to blend alcohol pens. Marker Using, Ohuhu 48 Color Art Markers Set Chisel & Brush Tip & Ohuhu 120 Colors Dual Tips Marker Pens.
The first thing you want to consider using alcohol pens is paper. I tend to prefer thick, smooth cardstock when working with alcohol pens. I find the weight of this paper works nicely for greeting cards as well as sketching. The Ohuhu Marker Pads are really a great partner of Alcohol markers. The paper is 200GSM. The heavyweight paper is very durable and has a smooth, flat surface. It is the perfect paper for blending without worrying about the ink smudging or bleeding onto the next page.
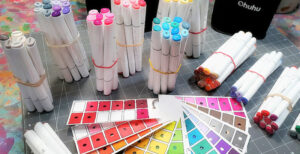
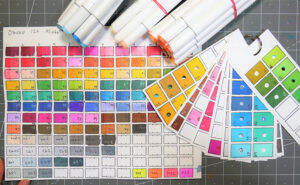
After picking your marker paper, you will want to swatch out all of your colors on that paper so you have an accurate representation of how they will look on a coloring project.
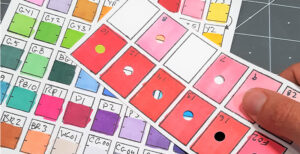
After swatching, I recommend grouping your markers together by color families so you will always have the colors that blend well with each other together. I keep these bundles of markers together with a rubber band. Then I made a larger swatch card for each family and attach them together with a book ring. This book ring can be clipped to my marker bag so I always have it with me when I color. I punch a hole in each swatch so I can compare the colors to my main swatch, by looking through the hole, when picking color combos. Tip: Keep your swatch with your markers so you have it when you need it!
There are many ways to get a beautiful blend with your alcohol markers. You will probably find one that works best for you most of the time with the type of markers you own and the paper you like.
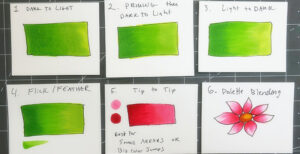
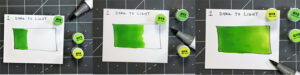
Blending method #1 Dark to Light
This method works great if your paper is easy to blend, and the colors are fairly close together. This works really well with chisel or bullet tips. You will need a dark, medium and light version of each color. First, add your darkest shadows to your shape. Then add your mid-tones while completely overlapping the dark areas. Then add your lightest shade overlapping the mid-tones. You want to work fairly quickly so the edges of the ink don’t dry before you apply your next color.
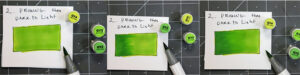
Blending method #2 Priming
This method works well if you have the paper that is harder to blend on, or you like to take more time when you blend. Begin by saturating the shape with the lightest color. In most cases, you should be able to see the marker color on the back of the cardstock. Then add your dark, medium, and light colors like you did in the previous example.
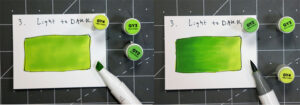
Blending method #3 Light to Dark
This is a popular method where you apply your light color and then overlap your medium and dark colors. This works best if your colors are very close together. This method works best on thin marker paper as opposed to an absorbent blending cardstock.
Blending Method #4 Flick/Feather (brush tips)
This method is for brush tip markers and works well for coloring hair and fabric. You use a heavy to light pressure flicking motion with your markers to achieve a soft, graduated blend. You can fully color the area with the lightest tone if you like, but you don’t have to. Typically I start with my lightest tone and flick from the lightest end of a shape, then I go in with my medium tone and flick toward the light end from the dark end and then finally flick with the darkest tone. The nice thing about this method is that you can go in the order that you like and keep adding flicks of color until the desired color and blend is achieved. This only works with soft, flexible brush tip markers.

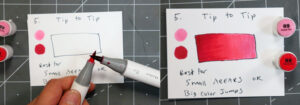
Blending Method #5 Tip to Tip
This method is great when you don’t have many markers or you need to make a big color jump and you don’t have the transitional colors to blend them. You need a light and dark version of a color. Touch the light marker to the tip of the dark one to pick up ink and then starting at the darkest area of the shape to start coloring. This works best on small areas because it can be annoying to keep reloading the marker tip with color.
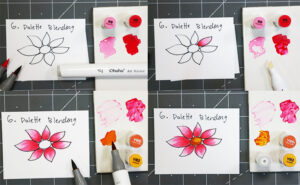
Blending Method #6 Palette Blending
For this technique, you will want a colorless blending marker, the colors you wish the blend, and a non-porous smooth surface like a ceramic tile, plate, or piece of plastic. First, make a palette by scribbling your markers on a tile. Don’t worry if they dry, as they will be reactivated by the clear marker. To color, your image, use the clear marker (or a lighter shade of the color you are picking up) to remove the color from the palette and bring it to the image you are coloring. This results in a dark to light blend like we did in method #5 but you can use a larger variety of colors. This is a great way to make use of a limited color palette, as you can make a variety of shades of each color by using the colorless blending marker.
Bonus tip! The colorless blending marker can also be used as an eraser if you make a mistake or your color bleeds out of the lines. Simply use the chisel end of the clear marker to color up to the edge of your illustration (from the background) and it will push the ink back where it belongs.
(*Good News! There is a colorless blender in each set of the Ohuhu Alcohol Based Markers.)
I hope you practice these marker blending tips and find out what works best using the paper and markers you have. Creating with Ohuhu alcohol markers is so fun and rewarding, and the results you can get will be amazing with just a bit of practice.
Happy coloring!
Source – Ohuhu.com